Showing posts with label Robyn's Recipe Calendar 2013. Show all posts

Sunday, December 29, 2013

Caramel nectarines on fruit toast

December 28, 2013


There's one final calendar recipe for 2013 that I didn't get to on time. It wasn't for lack of interest - October's recipe looked like a great sweet breakfast, but I couldn't reliably access the required nectarines until December.

So here it is at last - fruit toast, vanilla yoghurt, and some lovely caramel-coated, cinnamon-spiked nectarines. I'll be using any excuse I can to pull this trick on stone fruit for as long as they're available.


Caramel nectarines on fruit toast 
(seemingly sourced from the Woolworths website)

2 small nectarines
1/2 cup Greek yoghurt
1/2 teaspoon vanilla
1/4 cup castor sugar
20g butter
generous pinch of ground cinnamon
2 slices fruit bread

Cut a small, shallow cross in the bottom of each nectarine, place them in a bowl and pour boiling water over them. Allow the nectarines to sit for one minute before draining off the water. Let the nectarines cool.

Stir together the yoghurt and vanilla and set them aside.

When the nectarines are cool enough to handle peel off their skins, starting where it's pulled away at the cross. Slice the nectarines into eight wedges, discarding the stone.

Set a saucepan over medium heat and pour in the sugar, it will melt and turn golden. Add the butter and cinnamon, swirling the saucepan to combine the ingredients. Add the nectarine wedges, turning them to coat them in the caramel and allowing them to cook and soften for a couple of minutes.

Toast the bread and slice the pieces diagonally, dividing them between two plates. Pour over the nectarines and caramel, and dollop on the vanilla yoghurt.

Tuesday, December 24, 2013

Vegan nog

December 17, 2013


I have almost no reference point for egg nog. (Though, as always, one Simpsons quote: "'Tis the season, Marge! We only get thirty sweet noggy days. Then the government takes it away again.") I gather that it's like a drinkable custard with warm spices. Wikipedia tells me that it's also known as egg milk punch. Ummm, that sounds horrible.

This vegan nog isn't horrible at all - it's a soymilk-based cocktail, taken from my recipe calendar, that made for a nice weeknight dessert. I don't like drinking soymilk straight up but there's enough brandy here to distract me from any beany-ness. Though you could just stir the ingredients together, I'd highly recommend getting out a blender, stick blender or cocktail shaker for a frothy top.


Vegan nog
(looks to be sourced from She Knows)

1 1/3 cups soy milk
1/4 teaspoon ground cloves
1/4 teaspoon ground nutmeg
1/2 teaspoon ground cinnamon
1/3 cup brandy
2 1/2 teaspoons maple syrup

Place all the ingredients in a blender and blend until frothy; serve over ice.

Thursday, November 21, 2013

Spinach cheese puffs

November 19, 2013


Because Mum gives her annual recipe calendar to Cindy for her birthday, I'm not usually responsible for whipping up any of the dishes. But with Cindy pouring her energy into writing up Shu, I took responsibility for November. The dish of the month was these spinach-cheese puffs. They're possibly the least vegan thing we've made (although this 5 cheese lasagne must go close) - they've got milk, butter, eggs and two kinds of cheese in them.


They're very easy to make - melt the butter, stir the rest of the ingredients in and then divvie the mix up into little blobs and bake. The most time consuming part of the process was waiting for the frozen spinach to melt. The end results are little biscuits, with a crunchy exterior and a soft, quiche-like middle.  The flavour is really dominated by the gruyere. They're pretty enjoyable - serve with some salad to cut through all the richness.


Spinach cheese puffs

300g packet of frozen spinach, thawed
1 cup milk
1/2 cup butter
1 cup flour
2 teaspoons baking powder
4 eggs
250g grated gruyere cheese
1/2 cup grated parmesan cheese

Preheat the oven to 180°C.

Squeeze the spinach dry in a sieve to get all the water out.

Heat the milk in a big saucepan and add the butter and salt. Once the butter has melted and the mixture starts to boil, kill the heat.

Stir in the flour and baking powder until the mixture all sticks together and comes off the side of the saucepan.

Add the eggs one at a time, stirring them thoroughly into the mixture. After the fourth egg the mixture should be smooth and satiny.

Stir in the cheeses and spinach.

Lightly spray oil onto two large baking trays and then form the dough into little blobs - roughly a tablespoon in each. You need to leave them a border of a couple of centimetres for baking as they'll expand a bit.

Bake for about 20 minutes - they'll start to go golden before the insides are totally cooked, so don't jump the gun.

Thursday, October 03, 2013

Carrot-crusted beetroot tart

September 25, 2013


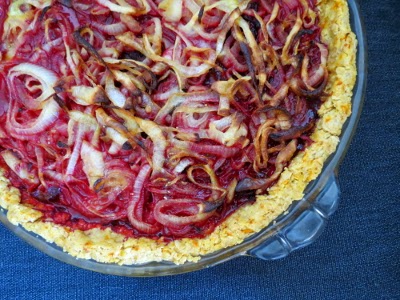
I saved up September's calendar recipe so that it'd fall outside VeganMoFo. It's basically a quiche, though it has some interesting touches - the base is full of wholegrains and carrots, while the filling is dominated by beetroot.

The base is certainly something I'd try again. It's a little thicker and more wholesome than your average quiche, albeit still packed with butter. This recipe doesn't include instructions to blind-bake it, and I think that's a mistake.

It's a mistake because it turns out that grated beetroot gives off a lot of water when it's baked. This tart never really set, with the smallish quantity and eggs and milk totally overwhelmed by the beetroot juice. The juice soaked into the crust and flooded the dish each time I cut a crumbling slice. It tasted fine, but the ingredients didn't work together well and the texture was entirely out of whack.

I'm at a bit of a loss as to how to rework this filling - less beetroot, or pre-cooked beetroot? More eggs and/or milk? I'm sure I'll think of something to fill that carrot crust.


Carrot-crusted beetroot tart
(presumably sourced from BBC GoodFood)

175g wholemeal flour
100g rolled oats
100g butter, cut into small cubes
100g carrots, grated
1 tablespoon olive oil
3 large onions, sliced into rings
3 medium beetroots, peeled and grated
3 eggs
250mL milk
salt and pepper

Place the flour, oats and butter in a food processor and blend them together until they resemble coarse crumbs. Add the grated carrot and process further until the mixture forms a ball. Set out a large piece of plastic wrap and transfer the dough onto it, folding the wrap over the top of it. Roll the dough out to fit a pie dish, unwrap it and ease it in, trimming the edges as needed.


Pour the oil into a frypan over low heat, add the onions and cook them until soft and browned, at least 20 minutes.

Preheat an oven to 180°C. Spread the beetroot out across the base of the pastry.


Arrange the onions over the top of the beetroot. Beat together the eggs and milk, and season with salt and pepper; pour this over the tart.


Bake the tart for 15 minutes, then turn the oven down to 160°C and bake for a further 40 minutes, or until the eggs are set. I found that the onions browned rapidly and so covered the tart with foil from the 15 minute mark onwards.

Wednesday, August 21, 2013

Thick golden dahl

August 7, 2013


We needed a simple meal to get us through the ludicrous task of packing up our house - moving always leaves you eating takeaway for the best part of a week, so we also wanted something healthy. Luckily, the calendar recipe this month delivered - a very straightforward dahl recipe loaded with lentils to fill us up and give us something nutritious.

There's really not much too this - some onions, lentils and a decent combo of spices. It's warm and hearty, with a mild chilli kick and some ginger and lemony tang. Using the ground up cardamom pods really makes a difference as well - the cardamom flavours came through strongly. Combined with a fresh baguette from Baker D Chirico and you've got yourself a pretty tremendous meal.


Thick golden dahl

10 cardamom pods
2 tablespoons vegetable oil
2 onions, chopped
3 cloves garlic, sliced
2 teaspoons turmeric
pinch of ground chilli
1 tablespoon fresh grated ginger
2 cups red lentils, rinsed
6 cups vegetable stock
1 bay leaf
juice of 1 lemon
salt and pepper

Crush up the cardamom pods in a mortar and pestle and grab the seeds (throw the crumbled pods away)

Heat the oil in a large saucepan, add onions and then cover and cook for about 5 minutes - they should go nice and soft.

Add cardamom seeds, garlic, turmeric, ground chilli and ginger and stir-fry for another five minutes or so. 

Add the lentils, stock and bay leaf and bring the mixture to the boil - drop the heat down so that it's just simmering. Cook uncovered for about 25 minutes - it'll thicken up nicely (the photo above is from the day after, when the lentils had soaked up even more of the liquid - it was still a bit soupy on the night). When it's ready to eat, stir through the lemon juice and season with salt and pepper.

Thursday, August 08, 2013

Pumpkin & chickpea salad

July 28, 2013


Here's a simple salad that sits equally well on a dinner plate, at a potluck table or in a lunchbox. Pumpkin and chickpeas supply all the carbohydrate and protein power needed to consider this a whole meal - not to mention the flavour spikes from lemon, ginger and coriander - but it could equally play side salad to baked tofu, a stuffed vegetable or curry.

Slicing and baking pumpkin can be a minor hassle, but there's little more to this recipe; it probably only needs 10 minutes of active time in the kitchen. We're having a slightly harried month, and Robyn's Recipe Calendar could not have offered us a more relevant recipe.


Pumpkin & chickpea salad
(most likely sourced from here)

1/2 butternut pumpkin, peeled and chopped into cubes
3 cloves garlic, skin still on
2 tablespoons olive oil
1 small handful fresh coriander, chopped
400g can chickpeas, drained
juice of 1 lemon
1 teaspoon minced ginger

Preheat an oven to 180°C.

Place the pumpkin cubes and garlic cloves in a large baking tray and drizzle over half the olive oil, tossing it through the pumpkin. Bake the pumpkin for 20-30 minutes, until tender but still holding its shape.

Transfer the pumpkin to a serving bowl. Peel the garlic cloves, smush them up and add them to the bowl. Gently stir through the coriander and chickpeas. 

Whisk together the lemon juice, remaining tablespoon of oil, and the ginger. Pour it over the salad and gently stir it through.

Sunday, June 23, 2013

Feta & mint filo parcels

June 16, 2013


June's calendar recipe is the kind of simple crowd-pleaser that every vegetarian should have in their repertoire. Feta, mint and lemon zest make a pastry filling that's bright yet rich, and ready in minutes. They're folded into layers of filo pastry, which can be wrapped up small for party bites or large for a meal. These cheese triangles are so flaky and tasty that no-one begrudges the shower of pastry shards caused by each bite.

For convenience, I used a powdered egg replacer instead of the real thing. It didn't seem to offer much binding power to our firm feta and I didn't really mind so you can skip the egg entirely if you please.


Feta & mint filo parcels
(from Robyn's Recipe Calendar 2013)

300g feta, crumbled
1/4 cup parmesan, grated
2 tablespoons mint, finely shredded
1 egg, lightly beaten
zest of 1 lemon, finely grated
375g packet filo pastry
125g butter, melted

Preheat an oven to 200°C and line two baking trays with paper.

In a medium bowl, mash together the feta, parmesan, mint, egg and lemon zest.

Unpack the filo pastry and roll it in a slightly damp towel. Retrieve two sheets of pastry, lying one on top of the other, and roll up the rest. Dab the pastry with melted butter and fold it longways once or twice, to form a long thin rectangle of half or a third the width of the original pastry sheet. Spoon a triangle shape of cheese mixture into one corner of the pastry and fold the triangle over and over to completely wrap up the pastry. (Since my instructions aren't great, take a look at this video.)

Repeat the pastry filling and folding to use up the ingredients and brush any extra butter over the pastries. Bake for 10-15 minutes, until crisp and golden.

Thursday, May 16, 2013

Tofu-ricotta cheesecake

May 12, 2013


This cheesecake is my May calendar recipe. It's a funny one, a tofu cheesecake that isn't vegan. It is full of protein; the tofu is backed up by ricotta and eggs. And it's sweetened with honey rather than white sugar (though there's no doubt some of that in the biscuit base).

I made a few substitutes for convenience - I didn't have the full quantity of almonds so supplemented them with cashews, I likewise topped my quarter-cup of honey up with maple syrup, and I used canned rather than fresh passionfruit. All of this worked out just fine. The use of a food processor for both layers made construction awfully easy, yet the major revelation was the baking technique. There's a water bath, but you don't put the cheesecake in it. Instead the water sits in a tray in the bottom of the oven, creating humidity. I have never seen such a serene cheesecake, smooth and barely coloured by the heat, gently pulling away from the sides of the tin all on its own.

The recipe includes the kind of sour accents I like - a gingernut base, limes in the filling and passionfruit on top. The more unusual ingredients still assert themselves effectively - there are overtones of tofu and honey (even at a half-quantity of the latter), while the tofu and ricotta team up to create a light and velvety texture I have not previously experienced in a baked cheesecake.


Tofu-ricotta cheesecake
(original recipe on the Woolworths website)

155g packet gluten-free gingernut biscuits
50g almonds
70g butter
500g ricotta
250g silken tofu
finely grated rind and juice of 2 limes
1 teaspoon vanilla
3 eggs
1/2 cup honey
170g can passionfruit pulp

Line a springform tin with baking paper.

In a food processor, grind together the gingernuts and almonds; transfer these crumbs to a bowl. Melt the butter and pour it into the crumbs, mixing thoroughly. Press the mixture into the base of the springform tin, smoothing it out with the back of a spoon. Refrigerate.

Preheat an oven to 140°C. Fill a deep baking tray at least half-way with water and place it on the bottom shelf of the oven.

Clean out the food processor, then use it to blend together the ricotta, drained tofu, lime rind and juice, vanilla, eggs and honey. Keep blending, occasionally pausing to push down anything unmixed on the walls of the container, until the filling is smooth.

Retrieve the base from the fridge and pour over the filling. Bake the cheesecake for 1 hour, it should be smooth, just barely golden and pulling away from the tin at the edges, and a bit wobbly in the middle. Turn the oven off but keep the cheesecake in there for a further hour. Next, let the cheesecake come to room temperature on a bench and finally, cover it and refrigerate it overnight.

Pour the passionfruit over the cheesecake before serving.

Wednesday, April 10, 2013

Ricotta-stuffed figs with orange syrup

April 1, 2013


With ricotta already purchased and figs well into their brief season, I launched into April's calendar recipe on the first day of the month. This is the kind of recipe I need just once, to prove what's possible, and thenceforth I (and you!) can just go for it - adding a little something to ricotta, slathering it over fig halves, pouring over a syrup and popping it all under the grill for a few minutes. Easy.

So here it's vanilla and orange zest into the ricotta, and a syrup based on orange juice. It's easy to imagine a pinch of cinnamon or ginger or lemon or lime zest, maple syrup, herb-infused syrup, any number of fruit juices. And why stop at figs? How about ripe peach or apricot halves, a pre-poached pear perhaps.

The original recipe would have us serve these with cream, but with the right ricotta I don't think there's any need.


Ricotta-stuffed figs with orange syrup
(available online here)

200mL orange juice
50g castor sugar
30mL Cointreau
150g ricotta
zest of one orange
1 teaspoon vanilla
6 fresh figs

In a small saucepan, stir together the orange juice, sugar and Cointreau over low-medium heat. Allow them to simmer until reduced by half - this took me about 10 minutes once I got the temperature right.

In a small bowl, stir together the ricotta, orange zest and vanilla.

Slice the figs in half and smear them with the ricotta, placing each one ricotta-side-up in a baking dish. Drizzle them with the orange syrup. Place them under a hot grill until the ricotta starts to brown, 2-5 minutes, and serve.

Thursday, March 28, 2013

Semi-dried tomato, spinach & ricotta fritters

March 25, 2013


Though I was leaving it a little late, the last week of March was a good time to tackle the month's calendar recipe. It made good use of a fresh vegetable delivery, especially a big bunch of spinach and some assorted other greens.

We increasingly fall back on fritters to use up vege scraps, but I never think to combine them with ricotta as in this recipe here. I took the trouble to buy the proper stuff from a deli instead of a watery tub from the supermarket (and kept half of it aside for an upcoming recipe). I wasn't sure that it'd matter, all mixed up with flour and spinach and sun-dried tomatoes, but the quality ricotta really shone through. Not only did I eat the fritters bare of chutney, but I left the side salad undressed and wasn't left wanting for flavour or richness.


Semi-dried tomato, spinach & ricotta fritters
(the source recipe appears online at Australian Healthy Food)

175g spinach, washed and trimmed
1/4 cup milk
1 egg
125g ricotta
1/2 cup plain flour
1 teaspoon baking powder
3/8 cup semi-dried tomatoes, chopped
1/4 cup basil, washed and chopped
salt and pepper, to taste
spray oil
2 cups mixed green leaves
handful of grape tomatoes

Bring a large pot of water to the boil and blanch the spinach for 30 seconds. Drain it and refresh with cool water. Squeeze out as much water as you can and finely chop the spinach.

In a medium-large bowl, whisk together the milk, eggs and ricotta. Stir in the flour and baking powder until well mixed. Fold in the spinach, semi-dried tomatoes, basil, salt and pepper.

Bring a frypan to medium-high heat and spray it with oil. Spoon about one-sixth of the batter at a time into the frypan, smoothing it out a little. Allow the fritters to cook for a few minutes on each side, until golden and cooked through.

Serve three fritters per person with mixed greens and grape tomatoes on the side.

Friday, February 01, 2013

Frozen lamingtons

January 23-24, 2013


After a well-deserved year off, Michael's mum Robyn has revived the recipe calendar tradition! I was quite excited that she tucked an all-new, personally curated and impeccably bound calendar into my birthday present last December. It's really back with a bang - the January recipe involved making ice cream! (I haven't been making enough, i.e. any,  icecream this summer.)

This is a cute idea - slicing chocolate frozen yoghurt into squares, dusting them with dessicated coconut to look like lamingtons, and serving them with raspberry sauce. It sounds fiddly, but it really wasn't too bad at all. Chocolate frozen yoghurt is a funny one - somehow the cocoa and cultured-dairy tang is really different to, say, a chocolate cheesecake - but it's a nice light flavour. And the raspberry sauce is a stunner, sour with a cheeky slug of Cointreau as well as the berries themselves.

We selfishly demolished the whole batch over the course of a couple weeks, but I reckon these frozen lamingtons are better suited to sharing with friends in a single sitting.


Frozen lamingtons
(most likely sourced from taste)

150g castor sugar
750g natural Greek style yoghurt
2 tablespoons cocoa
2 1/2 cups dessicated coconut

raspberry sauce
125g punnet raspberries
2 tablespoons icing sugar
1 tablespoon Cointreau, plus extra to dip


In a small saucepan, stir the castor sugar into 150mL water. Bring the mixture to the boil, then cook it for a further 2-3 minutes, continually stirring. The sugar should have dissolved to create a clear syrup. Set the syrup aside to cool.

In a medium bowl, whisk together the yoghurt, cocoa and cooled syrup. Chill the mixture for several hours, ideally overnight, and then churn it in an icecream machine. While it's churning, line a 20cm-square container with foil. Pour the icecream mixture into the tin, smooth over the top gently, cover the container and freeze the icecream until it's very firm, at least 4 hours and preferably overnight.

To make the berry sauce, place the raspberries and icing sugar in a blender and puree thoroughly. You may want to strain it to remove the seeds, but I kept them. Stir in the Cointreau.

Have your sauce, extra Cointreau and serving dishes ready, and place the dessicated coconut in a shallow bowl. Use a sharp knife dipped in hot water to cut the icecream into rectangles. Brush a little Cointreau on the sides of a 'lamington' and drop it in the coconut, shifting it around to coat all sides. Plate it up with some berry sauce underneath or on top, and repeat with the remaining icecream rectangles.