Showing posts with label Mo Wyse. Show all posts

Wednesday, April 05, 2023

Vegan bolognese

March 13, 2023


We had a quiet public holiday Monday lined up and I decided it was time to tackle something a bit time-consuming: a classic bolognese sauce from the Smith & Deli cookbook. The actual processes are super simple, just a lot of stirring and simmering, but it's the kind of recipe that fills up an afternoon. You start chopping after lunch, and by the time you saute everything and then simmer the whole pot for as long as you can handle, it's time to put the pasta on and settle down for dinner. It's worth the time you put in to it - rich and hearty with a lovely depth of flavour and nice gentle hit of acidity from the capers. We ate it on spaghetti all week and I simply could not get enough.


Vegan bolognese
(from Smith & Deli-cious by Shannon Martinez and Mo Wyse)

80ml olive oil
1 brown onion, diced
1 small carrot, diced
1 celery stalk, diced
8 button mushrooms, diced
3 garlic cloves, minced
2 tablespoons capers, mashed up
2 tablespoons caper juice from the jar
1 teaspoon chilli flakes
1 teaspoon dried oregano
3 tablespoons tomato paste
2 cups soaked textured vegetable protein (TVP)
1 cup soy milk
1 cup red wine
400g diced tomatoes
700g passata
1 cup beef stock
2 teaspoons powdered porcini
1 bay leaf
small bunch of basil leaves, torn
handful of parsley leaves, chopped
salt

Heat the oil in a large saucepan and stir through the onion, carrot, celery, mushrooms and a good shake of salt. Fry on low heat for 10 minutes or so, until everything softens and starts to turn golden.

Stir in the garlic, capers, caper juice, chilli flakes, oregano and tomato paste and cook for a couple of minutes. Stir in the TVP until everything is well combined.

Stir in the soy milk and cook, until it's almost entirely absorbed. Add the wine and simmer some more - until it reduces down by at least half. Add the diced tomatoes, passata, beef stock, porcini powder and bay leaf, plus salt and pepper to taste. Simmer over low heat for as long as you can be bothered - an hour or so is good. 

Check the sauce again and add salt, sugar or pepper as needed - stir through the basil and parsley and you're done, ready to serve with spaghetti or to use in lasagne or whatever you like.

Sunday, February 20, 2022

Coconut jam slice

February 12, 2022


After limiting my socialising a lot in January, I've been enjoying some face-to-face contact with friends in parks and homes this month. We had Ben and Natalie over for brunch, where Michael made a big pan of chipotle sausage hash, Natalie contributed a jug of fancy iced tea, and I had a tray of this coconut jam slice lined up in advance. (Ben also more than pulled his weight, measuring up a broken kitchen cupboard and planning a future repair!)

I think of coconut jam slice as an Aussie classic, although I don't hold a family recipe for it. I picture thick, golden-brown squares of biscuit with a seam of berry jam, and a pillowy top layer of desiccated coconut bound together in a meringue-like batter. This Smith & Deli version has clear similarities and differences. The biscuit base includes cocoa (going for a lamington vibe, perhaps?), and the topping is primarily thicker shredded coconut, lightly bound with an egg replacer and only toasting around the edges during baking.

This slice was popular with the group - the base holds up without any bending or crumbling, and I like the bold chewiness of the shredded coconut. But overall, this slice was just sweet, sweet, sweet to me, overpowering any potential contrasts from tangy fruit and creamy coconut. I would play around with different jam, less jam, and less added sugar in future bakes. The core recipe is simple to pull together, so it wouldn't be a chore to experiment and work towards a new family favourite.


Coconut jam slice
(from Smith & Deli-icious by Shannon Martinez & Mo Wyse) 

base
1 cup plain flour
1 tablespoon cocoa powder
3/4 cup desiccated coconut
1/2 cup margarine, melted
1 teaspoon vanilla

toppings
heaped tablespoon egg replacement powder
1/2 cup water
1/3 cup caster sugar
2 cups shredded coconut
pinch of salt
1 cup raspberry jam


Preheat an oven to 180°C. Line a small slice tray (mine was 27 cm x 18 cm) with baking paper.

In a medium bowl, stir together the flour, cocoa and coconut. Pour in the melted margarine, give it a little stir, add the vanilla, and stir until completely combined. Tip the mixture into the slice tray and use the back of a spoon or clean fingers to spread and press the mixture out into an even base. Bake for 15-20 minutes, then allow it to cool for at least 10 minutes.

While the base is cooling, use a clean medium bowl to whisk together the egg powder and water until frothy. Whisk in the sugar. Stir in the coconut and salt until well combined.

When the base has cooled slightly, spread the jam evenly across it. Spoon over the coconut mixture - it doesn't have to be tightly packed and even, but try not to have jam peeking through. Bake for 20-30 minutes, until the coconut is golden brown at the edges but not burned. Allow it all to cool completely before slicing and serving. 

Sunday, October 25, 2020

Spanish baked beans

October 20, 2020


I've been keeping my cooking pretty simple lately... few new recipes and no big projects. How simple? Well, making beans on toast has been the biggest deal of the past couple of weeks. When you do it the Smith & Deli way, there's cooking dried beans (never our forte!), a couple of veges, lots of dried spices and even a burst of capers. But mostly there's a lot of slow simmering.

That slow simmer really mellows everything out. The beans, a bit floury on their own, became soft and comforting. The fennel, vinegar and capers lost all their bite. I couldn't pick out any of the spices distinctly, though they contributed to the overall flavour. Our big pot of beans lasted for days. We made an effort to buy some fresh bread to eat with it, then garnished it in different permutations based on what else needed eating: a spoonful of sour cream, a vege sausage on the side, or a fried egg on top. These beans served us well every time.


Spanish baked beans
(slightly adapted from a recipe in 
Shannon Martinez & Mo Wyse's Smith & Deli-icious)

375g dried white beans
1 bay leaf
1/4 cup olive oil
1 brown onion, chopped
1 red capsicum, chopped
1 fennel bulb, sliced
2 cloves garlic, minced
1 teaspoon thyme
1 teaspoon smoked paprika
1/2 teaspoon chilli flakes
1/2 teaspoon cumin seeds
2 teaspoons salt
1 tablespoon tomato paste
1 tablespoon white wine vinegar
400g can diced tomatoes
500mL vegetable stock
1 teaspoon brown sugar
1 tablespoon capers
pepper, to taste


Soak the beans overnight in water. Drain the beans, and place them in a large saucepan with lots of fresh water. Add the bay leaf and pop on a lid. Bring the beans to the boil until just cooked. Drain the beans.

While the beans are cooking, prepare the sauce. Choose a big saucepan or a deep frypan, and use it to heat the olive oil over medium heat. Add the onion, capsicum and fennel, gently cooking them until they're soft. Stir through the garlic and thyme, cooking for a further minute. Add the paprika, chilli, cumin, salt and tomato paste, stirring and cooking for a minute. Add the white wine vinegar, dice tomatoes, stock, brown sugar, and capers, stirring some more. Turn down the heat and gently simmer the sauce for 30 minutes.

Remove the bay leaf from the beans, then combine them with the sauce in whichever of the two pans can fit it all. Simmer it all for another 30-60 minutes. Add pepper to taste before serving.

Wednesday, October 16, 2019

Brazilian slaw

September 27, 2019


We were tasked with bringing a salad to dinner at a friend's place and we turned to the Smith & Daughters Cookbook for ideas. We've enjoyed this Brazilian slaw at the restaurant in the past (it even makes our 12 hours in Melbourne post), so we decided to have a crack at making it.

It comes together pretty easily, especially if you take the lazy option of using pre-made chips for your garnish. There's a lot of chopping and prep involved, but you can easily knock it all together in half an hour or so I reckon. The pay-off is excellent - a zesty, fresh salad with lots of interesting textures and the added bonus of chips on top. It's a guaranteed crowd-pleaser.


Brazilian slaw
(slightly adapted from Shannon Martinez & Mo Wyse's Smith & Daughters Cookbook)

2 tablespoons of olive oil
kernels from two cobs of corn
100g oyster mushrooms, roughly chopped
1 tablespoon tamari
2 small granny smith apples, cored and cut into matchsticks
1 large carrot, peeled and cut into matchsticks
100g pimento olives, cut into rounds
1/2 purple cabbage, thinly shredded
small bunch of parsley
small bunch coriander

dressing
100g silken tofu
1 clove garlic, crushed
1 teaspoon salt
1/4 cup soy milk
2 teaspoons apple cider vinegar
2 teaspoons Dijon mustard
1/2 cup vegetable oil
1/2 cup olive oil
zest and juice of one lime

garnish
tortilla chips (the recipe has you making your own, but we just gabbed these)


Start by making the dressing - pop all the ingredients except the oils in a blender and whiz them together. Gradually pour in the oils while the blender is on low until you've got a nice thick aioli-style dressing.

Heat a tablespoon of the olive oil in a small frying pan and fry the corn kernels until they're lightly charred. Take the corn out, add the other tablespoon of oil and fry the mushrooms with the tamari until golden. Set aside to cool.

Combine the rest of the salad ingredients in a big bowl, along with the corn and mushrooms and a good shake of salt and pepper to season. 

Stir everything together with about a cup of the dressing (you'll have leftovers) and serve, topped with the tortilla chips.

Sunday, May 19, 2019

Smith & Deli brownies

April 19, 2019


I'm testing out a couple of different vegan brownie recipes in the lead-up to a special occasion. There are a few such recipes on the blog already, but I've still got the appetite to try more. 

The Smith & Deli cookbook was an obvious place to relaunch from. Their base recipe isn't too complicated; non-dairy yoghurt was the only ingredient we don't routinely have at home, and even it is easily found in most supermarkets now.

A large quantity of cocoa powder and a heaping cup of chocolate chips have these brownies looking very dark and rich, yet they're actually on the cakier side and not as deeply flavoured as I'd expected. I was able to strap a lunchbox of them onto the back of my bike to share with our friend who missed out on those shortbread cookies. These brownies were pretty great with a cup of tea, but I'm directing my search towards fudgier recipes next.


Smith & Deli brownies
(from Smith & Deli-cious by Shannon Martinez & Mo Wyse)

3/4 cup margarine
1/2 cup coconut yoghurt
1 1/2 teaspoons vanilla
1 1/2 cups brown sugar
1 1/2 cups gluten-free plain flour
3/4 cup cocoa
1 teaspoon baking powder
1/4 teaspoon bicarbonate of soda
1 cup soy milk
1 cup chocolate chips


Preheat an oven to 170°C. Line a 22cm square baking tray with paper, and lightly spray it with oil.

With an electric beater, cream together the margarine, yoghurt, vanilla and sugar until light and fluffy. In a separate large bowl, sift together the flour, cocoa, baking powder and bicarbonate of soda. Gradually beat these dry ingredients into the margarine mixture. Gradually beat in the soy milk until everything is well combined. Fold in the chocolate chips.

Pour the brownie batter into the lined baking tray, gently smooth over the top, and bake for about 45 minutes - it's OK for the centre to still be a bit wobbly.

Sunday, April 07, 2019

Cheesy broccoli pie

March 22-23, 2019


We had a weekend away in the country with a big group of friends recently and night two of our communal dining schedule was Pie Night. A few of us brought pre-prepared fillings and baked up a plethora of pies to feed the masses. Our contribution was a vegan cheesy broccoli pie from the Smith & Deli cookbook. It was wonderful, providing a nice burst of greens to offset the shepherd's and mushroom pies that others prepared. The cheesy sauce is pretty horrifying from a nutritional perspective, but it's goddamn delicious - gooey and a bit rich and the perfect pal for the broccoli. Highly recommended. 


Cheesy broccoli pies
(from Smith & Deli-cious by Mo Wyse & Shannon Martinez)

2 large broccoli heads, chopped
90g vegan margarine
1/3 cup olive oil
1 leek, white and light green parts, sliced finely
2 cloves garlic, minced
1/3 cup plain flour
1 cup veggie stock
1 cup soy milk
1 1/2 cups grated vegan cheese (we used mostly Bio Cheese)
1 tablespoon nutritional yeast
1 tablespoon Dijon mustard
1/2 cup parsley, chopped
1 teaspoon dried thyme
salt and pepper

Blanch the broccoli in a large pot of boiling water. Drain and set aside.

Heat the margarine and olive oil in a large saucepan and fry the leek until soft. Add garlic and cook for another minute before whisking through the flour and cooking for another couple of minutes.

Slowly add in the stock and soy milk, whisking to smoothness along the way. Stir through the cheese, nutritional yeast, Dijon, parsley and thyme and cook until the cheese has melted, 5 minutes or so. 

Add salt and pepper to the sauce to taste and then stir the broccoli back in. Cook for another 5 minutes and then leave to cool.

That's your filling - we wrapped halved Borg's puff pastry sheets into little squares around a few tablespoons of filling and baked until the pastry went golden (about 25 minutes). Spectacular.

Thursday, January 03, 2019

Kimchi, gochujang & cheese scrolls

December 16, 2018


I bought Cindy a copy of the Smith and Deli cookbook for her birthday and committed to cooking something out of it when the weekend rolled around. Cindy was keen to recreate the Deli's famous scrolls - the standard option in the book is vegemite and cheese, but we went for one of the alternatives: kimchi, gochujang and cheese.


I'm not a confident baker, but this came together pretty well in the end. I needed a *lot* more flour than the initial 3.5 cups specified in the recipe, but once I got the dough to the right kind of texture the rest was pretty easy. If you're making them for brekkie you'll need to get up early - there's a bit of time waiting for the dough to rest etc - but they're well worth the effort. We ate this whole tray in about 2 days and I'm keen to try more variations on future lazy weekends.


Kimchi, gochujang & cheese scrolls
(from Smith & Deli-cious by Mo Wyse & Shannon Martinez)

1 sachet of dried yeast (2 teaspoons)
2 tablespoons caster sugar
1.5 cups warm water
3.5 cups of flour plus extra if needed (I think I used at least 4 cups)
2 teaspoons salt
90ml olive oil
2 tablespoons gochujang, mixed with 1 tablespoon warm water and 1 tablespoon tomato paste (adjust the quantities depending on your love of chilli here)
1/2 cup of kimchi
200g grated cheese (we used the pre-grated Biocheese)

Combine the yeast, sugar and water in a bowl and leave for 5 minutes until it starts to froth up a bit.

Combine the flour and salt in a big bowl. Stir through the oil and then add the yeast mixture stirring constantly (the original recipe suggests using an electric mixer with a dough hook - I'd probably do this bit by hand next time, but do whatever you're more comfortable with).

Mix thoroughly until you've got a sticky dough ball - I had to add a lot of extra flour at this step to get a knead-able dough. Knead your dough for at least 5 minutes until it's soft and elastic. 

Leave to prove in a warm place for half an hour or so - it should double in size. Punch it back down to its original size.

Preheat your oven to 190°C. 

Dust your bench with more flour and roll the dough out into a big rectangle - about 45 x 30cm, maybe 10-15mm thick.

Spread the gochujang mix evenly across the dough and then sprinkle over the kimchi and cheese. Carefully roll the whole rectangle up into a giant spiral and then cut it into 8 scrolls, each about 6-7cm wide.

Lay the scrolls out on a baking tray, cover with a tea towel or plastic wrap and let them rest for another 15-20 minutes and then bake for 20 minutes, until things start to go golden on top. 

Leave the tray to cool for 10 minutes and then separate the scrolls and scoff them down.

Sunday, September 16, 2018

Artichoke & chickpea salad

September 9, 2018


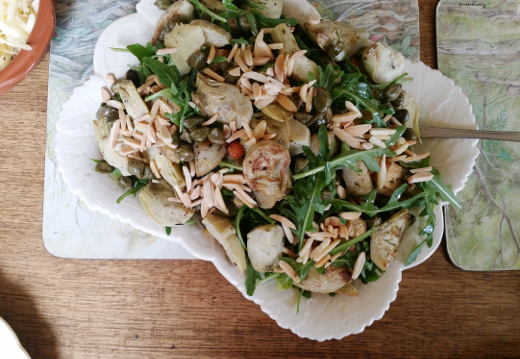
This is a salad that we've been enjoying for several years, thanks to Smith & Daughters. It's been on a couple of versions of their dinner and brunch menu, and it's also in their cookbook. It's hearty and hardy and pickley and just a bit toasted, something that works both as a side and as a main dish on its own. 

The original version pairs artichoke hearts with Jerusalem artichokes; I've gotten lazy about the root vegetable and just use regular old potatoes instead. My two other convenient pantry swaps are dried thyme instead of fresh, and maple syrup instead of agave.

This is the second or third time I've prepared it to share at a friend's house. It's usually tough enough to travel in its final serving state, but this one had a two and a half hour train journey between prep and presentation so I got finicky and packed many of the components separately. Rocket: in its own bag. Almonds: lightly roasted then jarred. Roasted potatoes and paprika chickpeas sharing one lunchbox, charred artichoke hearts and capers in another. Lemon-cumin dressing: jarred and ready for a last emulsifying shake before pouring. It was worth the effort to preserve all those textures, and the entire salad was happily demolished in a sitting, making the train trip home all the easier.


Artichoke & chickpea salad
(slightly adapted from Shannon Martinez & Mo Wyse's Smith & Daughters Cookbook)

1 can chickpeas
olive oil
1 teaspoon smoked paprika
small handful of slivered almonds
500g potatoes
2 teaspoons dried thyme
400g can artichoke hearts
45g capers
2 large handfuls rocket
salt and pepper

dressing
juice of 1 lemon
1 teaspoon cumin seeds
1 tablespoon maple syrup
2 teaspoons Dijon mustard
1/3 cup olive oil
salt and pepper


Preheat an oven to 180°C.

Drain and rinse the chickpeas, then spread them out in a small-medium baking tray. Drizzle over the some olive oil, sprinkle in the paprika and add a little salt. Stir well and bake for 20-30 minutes (mine never really crisp up as promised).

This is a good opportunity to toast the almonds in a separate small baking dish. There's no need for oil! Just keep an eye on them to avoid burning - they'll only take about 5 minutes.

Scrub the potatoes and slice them into cubes, skin on. Place them in a large baking tray, drizzle them with olive oil, then add the thyme, plus some salt and pepper. Toss everything together, then bake the potatoes until tender, 30-40 minutes.

After the almonds are out of the oven and cooling, There's probably enough time to make the dressing. Place all of the ingredients in a lidded glass jar and give them a thorough shake.

Drain and lightly rinse the artichoke hearts, then slice them into quarters. Lightly dress them with olive oil, salt and pepper. Set a frypan on high heat and sear the artichokes on 1-2 sides. Remove the artichoke hearts. Drain the capers and pop them into the pan for just a minute, until they pop.

When it's time to serve, layer up the rocket, potatoes and chickpeas, artichokes and capers, then the almonds. Pour over the dressing and lightly toss everything together if you have the space.

Monday, July 02, 2018

Kale & leek bake

June 11, 2018


We decided to use the Monday public holiday to cook up something new (you might have noticed that the blog is very heavy on the restaurants these days - we're still cooking, but mostly old favourites). I flipped through the Smith & Daughters cookbook and settled on this kale and leek bake - it seemed perfect for the wintery turn that Melbourne's taken. There's a bit of faffing around - you flavour up some soy milk stock, separately cook the leek and the kale, stir together a cheesy sauce to bind it all together and fry up some chunky garlic bread crumbs for the top. 

It's worth it though - hearty and thick, with an impressive cheesiness for a vegan bake. The crunchy breadcrumbs on top make it and we happily worked our way through the bake for work lunches all week. This will definitely come into our winter rotation. We served it up with this bbq baked tofu recipe, which was another winner - probably a bit more effort than you can really justify when you have so many other great tofu options, but a smoky, spicy treat to go alongside our cheesy bake.


Kale & leek bake
(slightly adapted from Shannon Martinez & Mo Wyse's Smith & Daughters Cookbook)

2 cups soy milk
1 cup veggie stock
3 garlic cloves, two minced and one smashed
1/2 teaspoon fennel seeds
2 bay leaves
1/2 teaspoon black peppercorns
small bunch parsley chopped (set the stems aside)
4 leeks, halved and cut into 1 cm pieces (set the green ends aside)
80g Nuttelex
olive oil
1 large bunch of kale, stems removed and leaves roughly chopped
1 teaspoon dried thyme
1/4 cup flour
120g shredded cheese (we use BioCheese because it melts well)
1 tablespoon Dijon mustard
3 cups stale bread, cubed

Pour the soy milk and stock into a saucepan and throw in the smashed garlic, fennel seeds, bay leaves, peppercorns, parsley stems and whichever green leek bits you can squeeze in. 

Bring to the boil and then take the mix off the heat and leave it all to infuse for 15 minutes. Strain the liquid into a bowl and throw out the stems, seeds etc.

Heat a tablespoon of the Nuttelex and a glug of olive oil in a frying pan and cook the white leek pieces with a pinch of salt. Give it 10 minutes or so until it's softened completely. Set aside.

Bring a large saucepan of water to the boil. Throw in a pinch of salt and the kale leaves. Cook them for 3-4 minutes until they've softened but are still bright green. Drain and refresh under some cold water to stop them from over-cooking.

Preheat the oven to 180°C and grease up a large baking dish.

Melt the rest of the Nuttelex in a frying pan. Add half the crushed garlic plus the thyme and cook for about 30 seconds. Add the flour and stir thoroughly until you get a paste. Cook for another minute or so and then gradually add the infused soy milk stock, whisking to keep it all smooth. Add the shredded cheese and mustard and keep cooking until the cheese is all melted through.

Fry the bread cubes in some olive oil along with the chopped parsley and the rest of the garlic. Cook for a few minutes until the cubes are crispy and lightly golden. Set aside.

Stir the leeks and the kale leaves into the cheesy sauce and then pour the whole mix into your baking tray. Top with the garlic bread cubes and bake for 20 minutes.

Tuesday, December 19, 2017

Melon salad with jalapeno-pickled pineapple

December 6, 2017


The Smith & Daughters Cookbook describes this fruit salad as a misunderstood menu item, met with indifference by most and then obsessed over by a rare few. I'm one of the weirdos who went wild for it in the restaurant, and it's become my most-made dish from the cookbook.

While the bulk of the salad is three kinds of mild-mannered melon, it's the sour, spicy jalapeno-pickled pineapple that bucks against all preconceptions. It's the counterbalance to those cloying rock- and honeydew melons I always needed but never knew how to ask for. They're fruits I've never previously sought out at the shops; now I've bought them five times in the past year!

Its creators explain that this salad is intended to sit right by the main meal, but that's not quite how I prefer it. I think of it more as a palate cleanser. I thought myself a genius when I served it alongside a corn chip tasting last autumn, and there are probably other rich, crunchy appetisers it would pair gloriously with. Earlier this month I took it to a friend's taco night and it was a bright, light end to the meal, when most people had already piled up one or two more tortillas than they really needed. It's not a conventional dessert, but it's pretty adept at replacing it mid-summer.

I have tinkered a little, but not a lot, with the recipe. I skip the garlic in the pickle brine, I use a dried bay leaf instead of a fresh one, and I use or omit the coriander stems depending on whether I already have them. I cut the fruit into whatever shape I feel like, and I find that the pineapple cores are completely edible once pickled.

This fruit salad has one last peculiarity you'd best prepare for - it doesn't mellow, but only gets more fiery with time!


Melon salad with jalapeno-pickled pineapple
(slightly adapted from Shannon Martinez & Mo Wyse's Smith & Daughters Cookbook)

1/2 pineapple
2 jalapenos
1/2 honeydew melon
1/4 watermelon
1/2 rockmelon
salt
handful of mint leaves

pickle brine
1 cup apple cider vinegar
1 cup caster sugar
juice and zest of 1 orange
juice and zest of 1 lime
1/2 teaspoon cumin seeds
2 whole cloves
1 cinnamon stick, broken in half
small handful coriander stems (optional)
1 bay leaf
1/2 teaspoon whole peppercorns


Prepare the pickles 3-24 hours ahead of serving. Place all of the brine ingredients in a medium saucepan and bring them to the boil. Turn down the heat and simmer the brine until the sugar is completely dissolved. Turn off the heat and allow the flavours to infuse at room temperature for 15 minutes. During that time, slice the skin from the pineapple, slice the flesh into thin half-rounds and then into triangular segments. Slice the jalapenos into thin rings.

Place the pineapple and jalapeno pieces into a bowl or large jar, and pour over the brine. Cover and let it all pickle for up to 24 hours (I store it in the fridge, although the original recipe doesn't mention this).

When it's time to serve, remove the rinds and seeds from the melons and arrange them on a platter or place them in a large bowl. Scoop the pineapple and jalapeno pieces out of the brine and add them to the fruit salad; sprinkle over a little salt, add the mint leaves and a little of the brine. If you're serving everything in a bowl, fold everything together gently.

Thursday, April 20, 2017

Corn & jalapeño pancakes

April 17, 2017


A long weekend is a good time to make brunch at home. This one comes from the Smith & Daughters cookbook and it's been on my to-do list for months! We've enjoyed the Panqueques Piquantes at the restaurant several times, and they looked pretty achievable for the home kitchen. (By comparison, my all-time S & D fave is the mock tuna & pea croquetta, and I've no intention of ever deep-frying my own batch.)

Indeed, these pancakes are a breeze once you've gathered the right ingredients. Although there's corn involved, these are batter-heavy pancakes rather than fritters. (Incidentally, there is a ripper recipe for jalapeño & corn fritters in the book too!) The pancake batter is filled out with a little polenta and studded with corn kernels and jalapeños. They might sound savoury but once garnished with maple syrup and coconut bacon, they're firmly on the sweet side. 

I've had some fraught times frying pancakes in the past, but we've recently invested in a proper cast iron pan and it worked a treat with just a little spray oil. The first pancake was the mandatory mistake one, but after that I was flipping neat lightly-browned rounds with ease! More importantly, they tasted terrific with a slurp of maple syrup and sprinkling of coconut bacon. The coconut's sweet-salty chewiness makes the perfect contrasting garnish and I'm upgrading its status from optional (in the book) to definitely worth the effort of marinating and grilling your own.


Corn & jalapeño pancakes
(slightly adapted from Shannon Martinez
& Mo Wyse's Smith & Daughters Cookbook)

1 1/2 cups soy milk
1 tablespoon lemon juice
3 tablespoons vegetable oil
1 cup plain flour
1/2 cup polenta
2 tablespoons caster sugar
2 teaspoons egg replacer powder
1 teaspoon baking powder
1/2 teaspoon bicarbonate of soda
pinch of salt
1/2 cup fresh or frozen corn kernels
1/2-1 jalapeño, finely chopped plus extra round slices to garnish
olive oil spray
a couple knobs of vegan butter or margarine to garnish
maple syrup, to serve
coconut bacon, to serve

In a small-medium bowl, mix together the soy milk, lemon juice and vegetable oil. Set them aside for a minute or two to curdle and thicken.

In a medium-large bowl, stir together the flour, polenta, sugar, egg replacer, baking powder, bicarbonate of soda and salt. Whisk in the curdled milk mixture to form a smooth batter. Fold in the corn and chopped jalapeño. If you have the time, let the batter rest for 30 minutes.

Set a frypan over medium-high heat and spray it with oil. When it's hot, pour in ~1/3 cup pancake batter; allow it to cook until bubbles form around the edge and it's starting to set on the surface. Flip the pancake and cook for a further minute on the other side. Repeat with the remaining batter. I placed cooked pancakes on a baking tray in a low-heat oven while I continued to cook the rest of the pancakes.

Serve the pancakes garnished with a knob of vegan butter, a few jalapeño rounds, a sprinkling of coconut bacon and a generous drizzle of maple syrup.

Tuesday, January 17, 2017

Hot cheddar & pickled jalapeno dip

December 11, 2016


Almost inevitably, the much-hyped cookbook from local favourites Smith & Daughters was part of Cindy's birthday present this year. It was no surprise - I'd had to tell Cindy to hold off buying it herself so that we didn't double up. To add to the birthday excitement, I threw in an offer to cook up Cindy's choice of dishes for the night.


It wound up being quite a feast - hot cheddar and pickled jalapeno dip to start, artichoke and chickpea salad for main, horchata to drink and melon salad with pickled pineapple and jalapeno for dessert. The horchata wasn't a complete success (I think our food processor doesn't quite have the power to get the rice liquidised properly), but everything else was a hit. Cindy loved the pickled pineapple when we tried the fruit salad for brunch last February, and we've already made it again - the blend of sweet, spicy and sour flavours is incredible. The artichoke salad was similarly great, another dish we loved in the restaurant that lived up to our memories.

The star of the night though was the hot cheddar and jalapeno dip, which again we'd been impressed by at the restaurant. It's surprisingly easy to throw together - one pot and about 10 minutes and you've got a gooey, cheesy, slightly spicy dip that's perfect for dunking chips in or pouring over just about anything else. We'll just reproduce the cheddar dip here - I'm sure we'll add a few more recipes in dribs and drabs over the coming months, but you'd do well to duck out and grab this book for yourself.


Hot cheddar & pickled jalapeno dip
(from Shannon Martinez & Mo Wyse's Smith & Daughters Cookbook)

125g margarine
1 large clove of garlic, crushed
1/2 teaspoon cumin
1/3 cup plain flour
2 cups soy milk
2 teaspoons Dijon mustard
1/2 cup nutritional yeast flakes
300g shredded vegan cheese (we used the Biocheese cheddar shred)
100g pickled jalapenos, diced
1/3 cup jalapeno pickle juice
1 teaspoon salt

Melt the margarine in a saucepan over medium heat. Add in the garlic and cumin and stir everything together, cooking for a minute or so.

Add in the flour stirring constantly. Cook for 2 minutes or so, making sure it stays reasonably smooth and doesn't brown.

Slowly add the soy milk, whisking constantly to keep things smooth. Add in the mustard, nutritional yeast, cheese, jalapenos, pickle juice and salt and stir everything together. Once the cheese melts you should have a thick, gooey dip - add more water if it's too thick or cook for a bit longer if it's too runny.